Owning and drone, or considering buying a drone is an exciting thing! There re so many skills and things that need to come together that it can be hard to keep track of them all! Preflight checks, maintenance, flying techniques and buying accessories can all build up to a mountain of knowledge! Here I am going to share with you all the ultimate list of drone tips that you must know if you own a drone or you are considering buying a drone!
There are so many things that you need to pay close attention too as you are flying, buying and maintaining a drone. My number one tip is always ask for advice and seek information in forums, YouTube videos and other members of the drone community if you are unsure of anything!
Here is a massive list of the 30 best drone tips that I have needed during every stage of my drone flying journey. If you cant particular advice on a certain part use these links:
- Drone buying tips
- Drone tips for beginners
- Drone flying tips
- Drone video tips
- Drone photography tips
- Drone maintenance tips
Let’s get right into it!
Drone buying tips
There’s nothing more fun than choosing a drone. The consumerist in me really likes to spend times comparing and contrasting all of the different features that each drone (new and old) comes with. I become obsessed with the details – I don’t know if that is a bad or good thing. Nonetheless, I’ve never had a bad experience and here I’ll share with you my best drone buying tips.
If you want a full guide on buying a drone – check out my other article here – I go through everything that you need to buy a drone with confidence!
Make a list of all of the things you want
The first drone buying tip is to make a full list of all of the features that are important to you. This may include flight time, camera specifications, ease of portability. You should get crystal clear on what is a deal-breaker for you and what are “nice to have” – if you can find them in a drone. Most of the time you can find a drone that matches exactly what you want but it may not be the drone that you first thought you’ll be buying. It normally takes me about a week to sit and get away from an emotional purchase!
Here are some examples of the features that you may decide are a deal breaker if you can’t find them in a drone:
- Cost of the drone
- Flight time
- Camera specifications
- Folded size for portability
- Battery charge times
- Lifting capacity
- Advanced flying features – Return to home, follow me, obstacle avoidance etc.
Take a long hard thing for the drone you want to buy. There’s one thing that will quickly put you off – and that is fancy marketing…off to our next tip.
Don’t be lured in by fancy marketing
There’s one thing that the top drone manufactures have got good at – and that is marketing their latest drones. You would have seen the apple-esque minimalist photos. The drone propellers in perfect alignment. The people smiling and laughing as they are having fun flying their drones. Remember, all of this is to evoke an emotional response from you in order for you to buy their products – after all, that is their business model.
Being aware of it is the biggest thing you can do to make sure that you do not get too sucked in. Marketers know that you make purchasing decisions based on emotions and then justify that decision using logic. The more they can move you to good emotions the more they can sell!
That’s why when I buy a drone I make a spreadsheet to compare all of the models:
Make your own spread sheet to compare
Making your own spreadsheet is a brilliant way to combine the top two tips. that is, a way that you are able to prioritize the purchase of a drone-based on its features and a way to objectively look at the drone – away from all of the happy faces and
When I’m comparing drones I create a spreadsheet with the features across the top, drones that I am looking at down the side, and then a pass and fail for each cell. That way I can quickly look across the whole selection of drones and make the best decision for the job that I want the drone to do.
Check for how much extras cost
One other aspect of the drone buying decision is to think about the additional costs of buying things like extra propellers and batteries. Not only their price but also how easy they are to get a hold of. You may want to grab some if you find a good deal online! These are the things that I consider when buying a drone:
- Cost of batteries
- Cost of extra propellers
- Cost of refurbishment services
- Ease of purchase of these extras
- Cost for a replacement controller
- Any costs associated with apps or in-app purchases
All of these costs should be factored into your budget as you’ll certainly need some of these.
Reach out to others with the same drone you are considering
There are plenty of online forums for drone enthusiasts. I have found that these communities are always incredibly helpful and always happy to help someone by sharing their knowledge. Some of the time they can be a little snarky, but mostly I’ve had good experiences. There are some popular and common places that you could go to ask about specific drones:
- DJI Mavic Drone Forum
- DJI Phantom Drone Forum
- Drone Forum – AVForums
- RC Drone Forum
- Drone Pilots Network
- RC Groups forum
- UAV Coach
The second place is to reach out to drone pilots in your area to see if they have had any particular experience with particular models of drones. These common interest groups can be found on Meetup.com as well as Facebook groups. As long as you approach these groups with an inquisative mind and are open to what people have to say – you’ll probably make some new friends too!
Drone tips for beginners
These tips are the tops drone tips if you are new to drone flying. There are plenty of ways that you can learn about flying and operating a drone. But if you follow the steps in this section you’ll be well on your way to becoming an excellent drone pilot. Let’s start with a simple but very important tip when you are starting out – read the manual!
If you want to find out more about drones for beginners check out my product recommendations and the best drones for under $500!
Read the manual
There are so many different types of drones with different features that it’s wrong to assume that if you can fly one drone you can fly them all. And if you haven’t flown before – you should definitely read the manual. The best place to find out about your new drone is in the manual! The manual will tell you everything you need to know and often includes a “Quick start guide” which means you can harness your excitement and get into the air sooner!
The manual will include important tips about maintenance and caring for your drone as well as the important operational aspects. Play close attenstion to the parts about using the remote control and make sure that you know all of the buttons that you have at your disposal. Once the drone is in the air the controller is the one thing that you have to connect you to the drone! – most people overlook how important it is to get to grips with it!
The manual should become your most read thing when you first get a drone. If you don;t have one – you can find a load of them online! Also, they make for great toilet reading!
Watch YouTube videos on the drone
Are you a visual learner? If you are, YouTube will allow you to get to grips with your new drone quickly. Also, a cheeky plug for our YouTube channel too – please check out Drone Flying Pro’s YouTube channel – where we answer your drone questions!
There are some awesome drone YouTube channels besides ours that you should subscribe to – they are all awesome:
You can learn a lot about drone flying, racing, and videography just by watching the best in the business. I recommend setting some time aside for reviews and flight tests of any new drone that you are considering buying or have already bought. I’ve found out some nifty tricks and I’m in no doubt that you can too!
Use a flight simulator if possible
Sometimes you can just feel like you need some simple training before you are comfortable enough taking it out into the wild! It’s also a great way to see if drone flying is for you without spending a dime on a drone! Quadcopters and drones can be really expensive so a little bit of training you save you from the heartache of a big crash!
Here are the top flight simulators that you can buy (the DJI simulator even has a free option).
- DJI Drones simulator – Free, Enterprise, and Energy versions available. It has different training modules that support nearly every drone that they have manufactured.
- DroneSimPro – $29.99 for Mac and Windows.
- Real Flight RF8 – $188 for windows
- Phoenix R/C – 139 for windows
Some of the above drone simulators offer the ability to link up with a controller so you get a real world flying experience. These drone simulators can test your flying, with real physics emulation. in a number of different flying conditions. These are all a great way for beginners to practice and also for seasoned flyers to get some virtual flight hours under their belts so that hey an execute even better when they next head out for a flight!
Choose an open flight location
Oh, the amount of times that I have been like “It’s only a few wires (trees, buildings) It’ll be fine!” and then having a near-miss that sends my adrenaline soaring. Learn from my mistakes and make sure that you choose a great flight location with plenty of free space and is free from wires, branches and other hazards that could cut your flight short.
When I first started flying my drone I took it to a cricket oval (or another type of public sports field) where there were a massive open field and no obstacles that I would risk bumping into. Also, the coastline is another beginner-friendly location to fly your drone! In fact, the coastline is one of the best places to not only fly for beginners for its open spaces – it is always simply the best place for amazing aerial photography. The contrast between the sand, the ocean, and the waves creates stunning photos and videos! Talk about the perfect location!
Making sure that your flight path is open and free of any hazards is one of the best things you can do to make your flight a safe and enjoyable one!
Set Return to home position
Many of the most popular drones have GPS location tracking and stabilization. With that capability comes the ability to set a return to home location. this location is used when you want the drone to automatically come back to the take off spot for a range of reasons – low battery, because you want it to, or because the controller has lost connection with the drone.
It’s one of the last fail safes that you have to prevent the dreaded fly away or for the worst to happen to your drone. So, before you head off on an adventure make sure that your home location has been set and that you are happy with the automatic landing spot. For example, that there are no overhanging branches or other hazards that could stop it from landing.
Most drones do this automatically now – but it is always best to check!
Drone flying tips
Here is a range of tips that will help every drone pilot – beginners, intermediate, and even advanced pilots can be helped by being reminded of these simple drone flying tips! There can be a lot of bravado around drone flying and so the first tip is a reminder to leave that ego at home!
Fly within your (and the drone’s) capacity
Whenever you are planning a flight, or you have just arrived on location, you need to ask yourself if you are flying within the conditions that you are capable of flying. This also includes the conditions that the drone is capable of flying under. That includes air temperature, wind conditions, potential weather changes that will occur during your flight, and any other environmental conditions like updraft from the edge of cliffs etc.
Most commercial drones will handle almost anything that you can throw at them. I have seen some pretty impressive high wind flights that even the smallest of DJI drones are able to handle with relative ease. However, there have been a couple of times where I have turned up to a shooting location and just not felt right about the conditions. Whether it was too gusty or there was a lot of spray coming off the ocean due to the wind direction – I called it off!
You don’t want your ego to be the cause of any expensive mistakes! Therefore, always fly in your, and the drone’s) capacity.
Hover before heading anywhere
When first taking off on your flight it always helps to just hover at head height for as little as thirty seconds to one minute to make sure everything is going well! During this time I am checking for a few things. The first is the sound the drone is making:
The noise that a drone makes is dependent on a load of factors but the biggest are the motors and propellers. My Mavic Air sounds like a swarm of bees, while a larger drone will have a much lower frequency. The sound should be consistent and change or pulse as the drone does maneuvers or tries to stay steady in the wind. Lets the drone hover for a bit and take note of what it sounds like. As long as there are no high pitched noises or abrupt stopping and starting of noises you are in the clear!
Then I’m checking it’s stability.
Does the drone wobble? Is there any motion or swaying in the drone’s position as it is stationary or at the end as it is changing direction? It could signify that a software calibration is needed. If you want to find out the main reasons that a drone wobbles check out my other article.
Does it hold it’s position? Take your hands off the controller and the drone should hover in position. Does it drift? The GPS signal should keep it in place and ensure there isn’t too much of a drift. We want to make sure that the drone stays still because when you are doing some awesome time-lapse shots it needs to maintain its positioning (both height and location).
And finally, you should check that the thrust results in a smooth motion. Hover the drone at eye level and ascend the drone as quickly as it will go. You are looking for a smooth, even ascent. The drone will make a fair bit of noise and may drift a little. But a nice even upwards direction is what you are looking for.
Read and rules and regulations
Long gone are the days where you can simply pull out a drone and fly it (nearly) anywhere. Now, you have to be mindful of all of the local rules and regulations that dictate where you can and cannot fly. You should check to see if your country actually allows you to fly drones or if you need to get a license or special bits of paperwork to take your drone to the best spots in your town and city.
Here are some good resources that can help you work that out:
Drone flying restriction in USA
- https://uavcoach.com/drone-laws-in-united-states-of-america/#:~:text=You%20must%20be%20in%20a,Administration%20(TSA)%20security%20screening.
- https://www.faa.gov/uas/
- https://dronedj.com/2020/05/13/usa-drone-laws-faq/
Drone flying restriction in Canada
- https://tc.canada.ca/en/aviation/drone-safety/flying-your-drone-safely-legally
- https://www.cbc.ca/doczone/m_features/drone-laws-canada
Drone flying restriction in Australia
- https://uavcoach.com/drone-laws-in-australia/
- https://www.casa.gov.au/knowyourdrone/drone-rules
- https://www.casa.gov.au/drones/rules/sub2kg
- https://dronedj.com/2020/05/18/australia-drone-laws-faq/
Drone flying restriction in UK
- https://www.nottinghamshire.police.uk/advice/drone-law-uk
- https://uavcoach.com/drone-laws-in-united-kingdom/
I’ve never had any issue while flying my drone other than the odd person come up to me and tell me that I cannot fly it a particular location. Instead of arguing with them I often just land the drone and move on. It’s not worth getting into an argument over something as simple as flying a drone.
Try out all of the automatic functions
Even the most advanced flyers can get something from learning all of the advanced features that their drone has. Features like automatic shots, follow me, point of interest and flying by way points – all these could come in useful at some point.
A lot of fellow drone enthusiasts swear by flying the drone manually – which is a great skill to have – but you could be missing out on some easy to get shots by ignoring the features that the drone comes pre-programmed with! Some on my Mavic Air are a little lame – but I love the ease of grabbing a quick dronie with friends!
Practice flying toward yourself
The last drone flying tip is to practise flying towards yourself. If your drone isn’t equipped with headless mode, where the controls are agnostic to the direction the drone is facing, you should spend some time with this mental challenge.
As the drone is facing you the left and right directions get switched which means that it can be challenging to bring the drone into land. The only thing that will get you used to this new way of flying is to spend time doing it! So, head out and try to take some fun selfie shots!
Drone video tips
Here we will go through all of the video tips that will help you get awesome cinematic shots that you can be proud of! We’ll pay particular attention to tips that will also make your drone editing time a piece of cake – we don’t want any moments where we wished that we’d just grabbed that one extra shot!
Hold the shot
The first tip in this section is to remember to hold the shot for longer than you need it to be. I like to do a minimum of ten seconds – even if I know the shot will be used as a transitional shot in my edit. This is because:
- It allows me to pick the best part of the shot and make sure I have enough either side for smooth transitions
- Sometimes I like to play with time dilation and contraction effects. I’ve been known to do a quick time-reversal too – in time with the music – having a longer shot than I need means that I can speed up the shot and still have plenty to play with!
It can easy when you are whizzing around to assume that you have “the shot” but often I wish I had just left it linger for an extra few seconds.
Combine multiple movements
Okay, if you only take one tip away from this section let it be this one. When you are creating cinematic panning shots you should combine 3 movements (two minimum for the perfect shot. Let me explain why…
When I first started out with drone footage, I would rely on static shots and single movement shots. This still created some awesome moments – but I wasn’t sure I was nailing it! This is when I discovered the power of combining multiple movements – and the results spoke for themselves.
The biggest tip I have for you to make the most of your drone shots is to combine three or more movements to maximize the cinematographic feelings of your videos. By that I mean you have these movements and rotations of axis to choose from:
- Yaw right/left
- Pitch up/down
- Roll right/left
- Throttle up/down
- Camera pan up/down
- Camera pan left right (on some models)
What I like to do is start moving the drone in one direction. Then add another movement with the other joystick. Then I add a third with the camera or adjustments to the joystick.
The trick is to hold the sticks and gimbal wheels steady so that you achieve a smooth movement for at least ten seconds. When you come to edit the footage you will have some awesome footage that will be smooth and long enough for you to speed up if you need to!
Check the settings before you take off
You don’t want to waste your precious drone flying time fiddling with your video settings. I recommend that you take a best guess of the settings you will need before taking off. Most of the time you’ll still need to fiddle with them when you are in the air but you won’t have to start from scratch.
The important settings that you need to adjust are:
- White balance
- ISO settings
- Frame rate
- Aperture
The best settings for most drone flights are:
- Codec: H.264 (8-bit)
- Resolution: Highest your drone will allow and your computer can edit comfortably (HD or 4K)
- Color: Normal or DLog-M (advanced users)
- Video format: MP4 or MOV
- White balance: Sunny or Cloudy
Remember that this is only a guide and you’ll need to adjust as you go. For a full rundown on the best video settings for drones – check out my other article here.
Have a detailed shot list!
Whether you are doing this as a professional or you are doing it as a hobby – you have to have a detailed shot list before you take off! If you are just flying for fun – no biggie – but even in my most relaxed flights, I like to know what I am going to shoot, roughly!
It can be as simple as list on the back of an envelope or it could be as detailed as sketching out some frames. Whatever it is it’ll help.
Use a cinematic mode (or other smart mode)
Most of the commercial grade drones now have a load of really advanced automatic capture settings. You can even use a cinematic mode of DJI drones to smoothly move through a scene. I use this pretty often as I feel like the drone responds better to my joystick movements and I can make tiny adjustments on the sticks without ruining a shot.
Check out the automatic modes that you drone comes with and never be afraid of switching them on to improve your shots – work smarter, not harder.
Drone photography tips
Now let’s go through the best drone photography tips! If you want to want to know what the best drone is for photography – check out my other article here.
Enable grid lines
The best thing to do when you are starting out is to enable the rule of thirds grid in your shots so that the composition is pleasing to the eye! I think that every drone that has been made for photography has the ability to turn on the rule of thirds grid one the live view.
You should position the subject of your shot -person, landscape feature etc, at the intersect of the grid. It’s a very quick and easy way to ensure that your shot are nearly always perfect!
Overexposure warnings
Over exposure warnings on the camera live view will help you remove any issue you have with areas of your shots being over exposed – which means white, bright and lacking any contrast. The overexposure warning often flashes up like Zebra’s stripes on the screen. When you get this you can turn the ISO down, reduce the shutter speed or clode the aperature a little bit!
The issue is really apparent when you get back to your computer and you realize that one part of your image is washed out and that you cannot recover it in any way!
Stick to a low ISO
ISO stands for “International Organization for Standardization” and is a historical term that was used to rate the film sensitivity. Nowadays, it is used to describe the sensitivity of sensors in digital cameras.
Standard ISO values will vary a little from manufacturer to manufacturer but all will have what they call a “Base ISO”. This is the lowest sensitivity setting on the camera and will give you the best image.
A base ISO for most drone cameras is 100 – always try to use this!
If your image is too dark (like in low light conditions) you can increase the ISO – but go too far and your image will get very grainy. Where possible stick to the base ISO as much as possible.
Understand camera lens filters
Neutral Density Filters reduce the amount of light entering your camera without affecting the colour tones. And, due to reduced exposure value, you can make full use of slow shutter speeds bringing a natural feeling to your drone videos.
Start with a ND16 filter when filming while flying your drone during daylight.
You will need to buy packs that are specifically made for your drone model. You’d hate for them to come off during a flight. They also need to be well fitted and quality construction so that you don’t get any light leakage into the camera!
Seek out symmetry patterns and lines
Humans love to bring order to the chaos of nature by building things that are symmetrical. Luckily for use this makes for a massive opportunity for excellent drone shots! Some cities (like Barcelona) are perfect for this short of drone photography. Have a look at your city to see if there are any blocks or neighbor hoods that would make for a great drone shot like these.
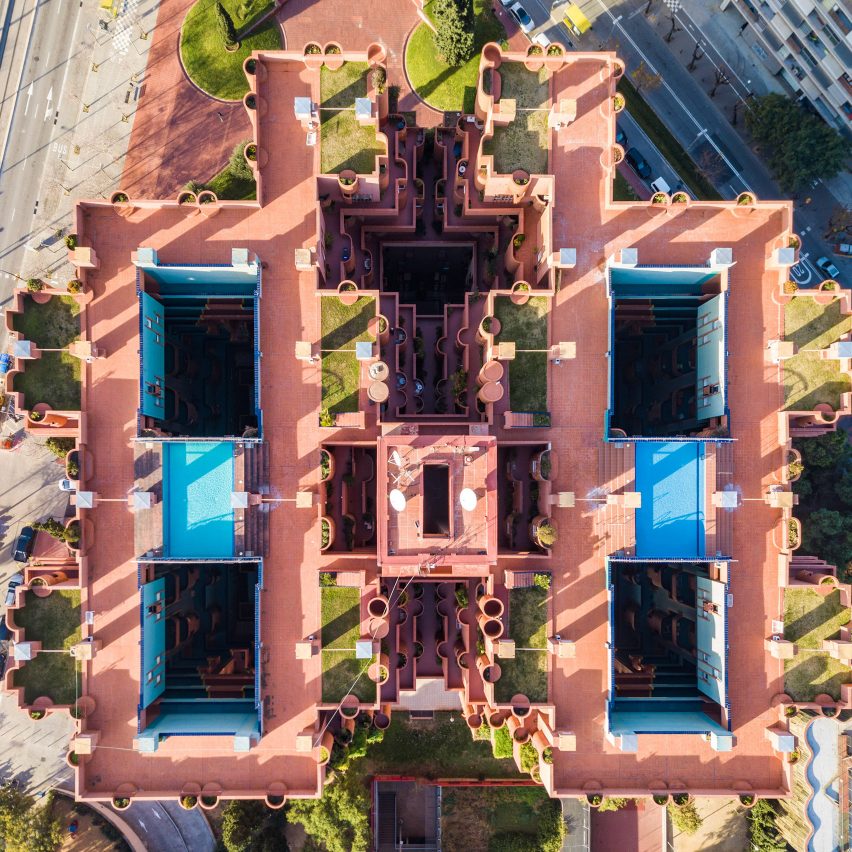
Roof top gardens and pools provide a lovely contrast to the concrete and brick. A little bit of nature way up in the sky!I have another really detailed article that talks through all of the ways that you can me your drone shots better and give you inspiration for your next drone shoot – check out the 20 ideas to level up your drone shots, here.
Drone Maintenence tips
The last set of tips is all about making sure that your drone is maintained as best as possible so that it will always perform at it’s best when you need it to!
Batteries at 60% charge
The evening before heading out into a shoot location – I will check the batteries and fully charge them is necessary. But I do not store them fully charged. Follow these tips when they are being stored:
- Some smart batteries have been designed to discharge until they are at 60% charge if they are left unused. This is the safe storage charge.
- When you have finished flying leave your drone batteries at 60 % charge or top them up to this level.
- Keep them indoors at room temperature.
Following these rules will help you get the most from our batteries and extend their lifetime.
Clean your drone
One of the most difficult times I have had to clean my drone is after a bee attack. This is the worst mess I ever had on my drone but these cleaning rules apply for every sticky issue with your drone. This is the process that I use:
- Remove the propellers.
- Wipe down the propellers with soap and water.
- Check the propellers for any significant damage (particularly to the leading edge of the blade.
- Use a lightly damp cloth with soap and water to remove any bee remains from the body of the drone.
- Pay particular attention to the vents of the drone – where it draws in air.
- Use a toothpick to collect the bee remains from the edge of the vents (be careful not to push it back inside)
- Let the drone dry for a few hours.
- Reassemble the drone and take for a test flight.
If any significant dirt got into the motors it could cause a fair bit of instability – take the time to check for stability before your next big flight!
Buy a good quality case
If your drone doesn’t come with a fitted case – you should buy one. It’ll be one of the best investments you can make as it will protect your drone and keep it safe from everything that the world has to throw at it.
Replace your propellers
You should aim to replace your propellers every 200 flights – if they are not damaged before hand. Propellers can easily become brittle with age and exposure to the elements. So check them regularly and if you are uncertain – you should change them.
They are after all, the only thing keeping your drone in the sky and are inexpensive to change.
Update firmware
Just like a computer, drones have software that runs all of the important components of your drone. Drone manufacturers regularly release firmware upgrades to fix bugs and add new features to your drone and remote control.
So if you want the best flying experience – you should always keep for drone and it’s firmware up to date!
Download new versions of the app
Drone manufacturers use apps on smartphones to control drones. It is a very inexpensive way for drones to have a smart controller with a screen and it means that the set up is much more convenient for the pilot. After all, you’ll always have your smartphone on you!
New versions of drone apps will include new features that the drone companies have released. This could be fancy new smart capture options – like the boomerang selfie on the DJI drones. New updates also get rid of any bugs and security weaknesses that users have reported.
Update maps
Many commercial drone use GPS for return to home self navigation as well as advanced photography techniques and automation. These functions require the drone to have an up to date map. Connecting your drone and the app to the internet regularly will make sure that any map updates (which includes updates to no fly zones to keep you legal!) will happen!
Once the map is updated in the app there’s also no need for you to be connected to the internet. In the DJI GO4 app there is an option to “cache map in the background”. When you are flying it will use the stored map data instead of needing to download the data while flying.
To store a certain portion of the map: With an internet connection open the DJI map and tap it to make it full screen. Zoom and drag the map to the area where you will be flying. Scan around and make sure that you cover an area slightly bigger than you need. The DJI GO4 app will then use this stored data instead of downloaded data.