As drones become more and more capable of incredible cinematography the options for video format and video settings increases seemingly exponentially. Changing the video format allows you to capture different quality images and footage. It can also have some serious implications for your post-processing software. In this article, we’re going to go over how to change the video format on DJI drones and some of the other most important components of video settings and formats.
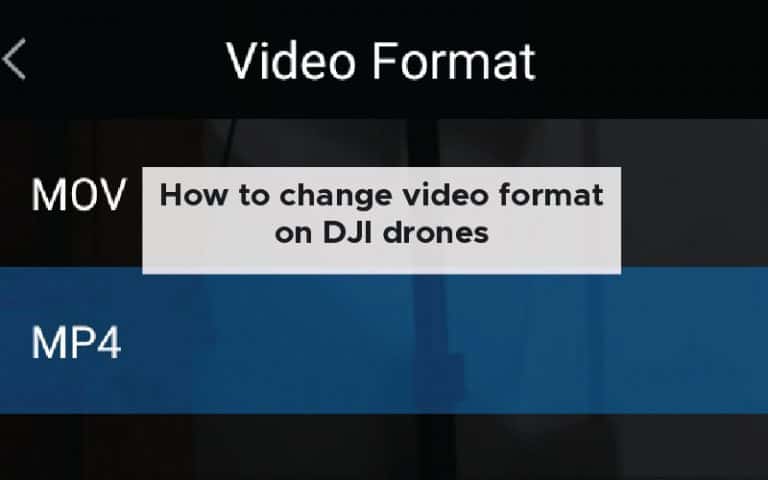
To change the video format on a DJI drone you have to make sure you are in video mode then click on the settings button (below the shutter button), select video options, click on video format then choose between MOV and MP4.
The two video formats have differing histories and are better suited to some applications over others. Before we launch into the details of the DJI GO4 app we should understand the types of video formats that are available on DJI drones and the benefits and drawbacks of each.
Types of video format
The majority of drones can record footage into formats MP4 and MOV. These are both widely supported video file formats and the choice depends on the requirements of the drone pilot.
Both video formats use a lossy video compression approach. This approach makes the video much smaller in size as it eliminates portions of the data that are less significant. Both of these formats retain the most important information about the video after compression.
There are thousands of formats available and they are grouped into a variety of different varieties. These can also be broken down as:
- Lossless codecs – as the name suggests these formats reproduce video exactly as they are produced with no loss in quality.
- Lossy codecs – these lose a small amount of information during the decompression stage to reduce the file size. These formats are great for drone footage that needs to be uploaded to the internet or sent to someone via email.
Even though both of these are lossy compression types the drone footage achievable from them is still able to be published online in the highest qualities whilst keeping the overall file size small enough to edit seamlessly on every modern computer.
MOV
This file format was originally developed by Apple. It was intended to support its QuickTime movie player and was often used to say videos and movies.
The algorithm was developed by Apple and is compatible across different versions of Mac and Windows operating systems. Even though the compatibility is relatively high there are some issues that may arise with MOV format videos due to the proprietary nature of the algorithms used.
MP4
MP4 is an industry standard and has much larger support for operating systems than the Apple proprietary MOV. Not only are they supported by Apple and Mac computers they are also compatible with a wide range of handheld devices and video players.
This file format is also able to include video, audio and subtitles into one file. MP4 features a high degree of compression whilst also retaining good quality and has become an industry standard for videos.
MOV vs MP4
There are a number of online software options which can convert between the two formats. So, if you need to convert between the file types because of an error in your drone settings you needn’t worry. There are some excellent options out there.
I always record in MP4 because it is more of an international compression standard than MOV.
However, if you are working on a Mac for your editing MOV is a safer option and is more efficient because the MOV file is supposed to be of a higher quality when used for editing in Apple-based editing programs.
If you are working on a Windows or Linux system MP4 will be a better option because it is supported more broadly by different video players and video editing software.
When you start looking into the formats of the video editing you may start to notice terms like H.265 or H.264. For a new drone photographer, this can start to get very confusing so it’s important to understand, very broadly what the difference is between these two codecs.
H.265 vs H.264
A codec name is a mash-up of two words = code and decode (co-dec). Very broadly, it is a computer program that uses a form of compression to shrink a large movie file (as captured by your drone) and then the codec decompresses the video from its compressed state for playback or editing.
Ultimately, every single codec that a drone uses is to achieve one thing – to store your data in as small a file as possible with no loss of quality (in reality it’s as little loss of quality as possible).
H.264 is an industry-standard also called AVC or advanced video coding. It works by processing frames of the video using a block oriented, motion compensation based video compression standard.
Even though that sounds relatively confusing what you really need to understand is that the algorithm produces a lower amount of data transfer than previous standards and is widely used by streaming Internet services like YouTube.
The newer version is called H.265 and is more advanced in many ways. The main difference is that this format allows for further reduced file size and therefore reduced bandwidth of live video streaming. The drawback is that the newer codec requires more advanced hardware to fully compress and decompress the data.
This means that viewers with compatible devices will require less bandwidth and processing power to decompress the data and watch a high-quality 4K video over common network speeds.
For high definition drone footage, we’d recommend H.264. H.264 is a family of standards with a wide number of use cases. This is what a number of drones default settings are but take a moment to check what codec your drone uses.
Now that you understand all of the important aspects of each of the format options here is how you change the video settings on a DJI drone.
How do you change video settings on DJI?
In order to change the video format on a DJI drone, you should first open up the DJI GO4 app and connect it to your drone.
Make sure that you are in video mode and not photograph mode. This will allow you to manipulate the video settings as opposed to the photography settings.
Then, you should push the settings button which is underneath the shutter button when viewing the first person view of the drone in landscape mode.
This will open up a menu and you should click on the video camera icon.
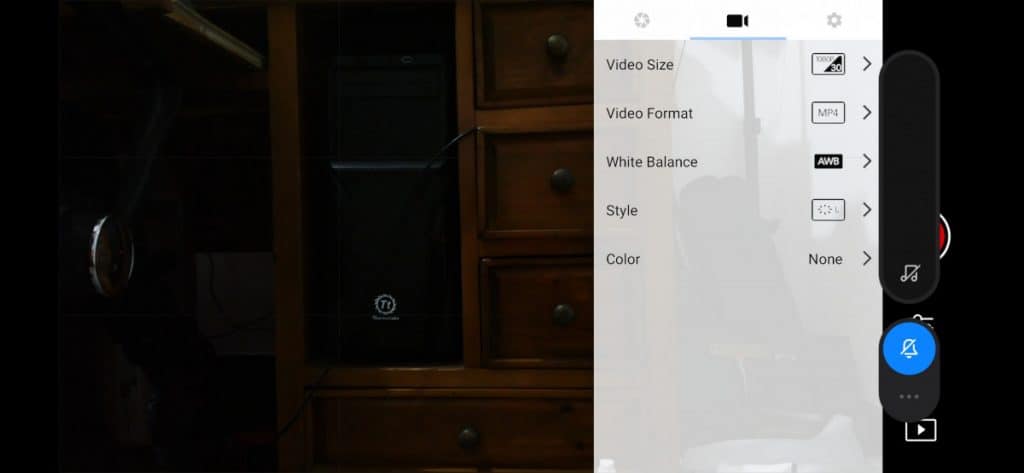
You will then be presented with video size, video format, white balance, style, and colour.
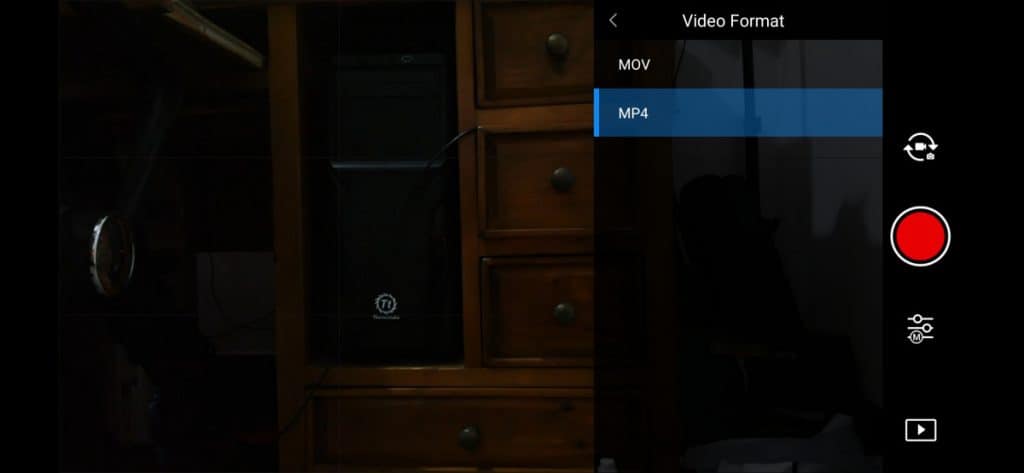
Select the video format option and you will be able to choose between MOV and MP4. In some drone models you will also be able to select the codec that you want to use. I recommend that you stick with the H.264 codec as it is the industry standard which is compatible with a wide range of online streaming services such as YouTube.
Navigating out of this menu will save your choice and then you will be able to record the drone footage in the format of your choice.
Personally, I always record in the MP4 format since I do not use Apple products or services for editing my drone footage.
I have a Windows computer and use Adobe Premier pro for editing and colour grading my footage. I have found that I have never had an issue with editing drone footage of this size or format.
If you are editing on an Apple computer you may wish to use the MOV format. If you are new to this I recommend that you trial both formats while you are in your early stage of learning and then select the best option for your editing hardware.
Even though video format is a very important setting for your drone footage there are other options which you should also take a look at if you want to make the best drone videos possible.
Other video options on DJI Drones
There are many options for your DJI drone video settings and if you want to know more about each of the sections, below, you should check out my other article – best drone video settings – click here to find out the best settings for the perfect videos.
When you are presented with a range of options in the video settings it can be a little bit overwhelming. Here, we will go through exactly what you need to know about each setting so that you can hack your way to amazing footage that will make everyone jealous.
Video size
Video size is ultimately the number of pixels in an image. From 720p all the way up to 4K resolution and higher drones are squeezing more and more pixels into their sensors.
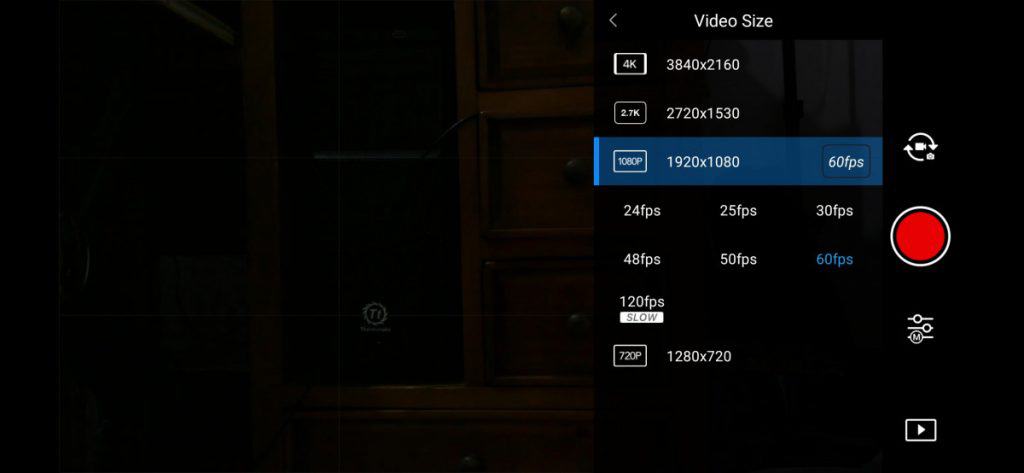
Most people make the mistake that the ‘p’ in the above numbers stands for pixels – it does not. The ‘p’ stands for progressive scan and the number refers to the number of horizontal lines that each video frame has.
Here’s a list of video qualities and the number of lines that video quality has:
| Video quality | Horizontal lines | Vertical lines |
| 360p | 360 | 640 |
| 480p | 480 | 854 |
| 720p | 720 | 1280 |
| 1080p | 1080 | 1920 |
| 4k | 4096 | 1072 |
4K
4K has become an industry standard for drone footage. This is because this quality footage is able to be shown on large screens with no loss of quality. However, it may not be the best choice for you.
Most of my drone footage is recorded in 1080p. This is simply because I do not need the quality to be any higher for my content produced on YouTube or for my other video projects. I have sometimes recorded in 4K if someone has specific requirements but for me, it’s a little bit overkill.
I think that in the future, once my video editing software and hardware is better, I will use 4K more often. However, I need to produce a proxy to edit it seamlessly and smoothly in my current hardware setting.
2.7K
This is the top resolution of the DJI Mavic mini. It is classed as high definition and is in between 1080p and 4K. A great option if you need to crop your footage and you don’t want any loss of quality when you are exporting at 1080p.
1080P
This is the quality that I primarily use when I am creating and recording drone footage.
It is the perfect combination of video size and quality for my usage. It is always good practice to record in the highest quality possible however I find that my postprocessing process works much more efficiently if I do not have to work with 4K footage. Also, I sometimes want a high frame rate. This produces awesome smooth footage at slow motion video speeds and my drone is unable to support 4K high frame rate footage.
720P
This is the lowest quality of footage that I would consider collecting with my drone. 720p is still considered high definition and is able to be played on online services such as YouTube with very little distraction from low quality streaming.
Fps (Frame Rate)
At low frame rates, you typically have the option of 24, 25 and 30 fps. Why do we need so many. Well, there’s a long convoluted history of why these exist but the basic rules are:
- In europe/oceana = 25 fps
- In the USA = 24 fps or 30 fps
Really, unless you are planning on broadcasting this on a particular channel you’ll be fine with any of the above and there aren’t many people who can really see the difference between these frame rates. All will give you an excellent video!
Slow motion frame rate
High frame rates give you the option of slowing down your footage without having to double up on frames. Known as dropped frames. This gives you the best cinematic look. For example, you can slow 60 frames per second video down by half on a 30 frames per second video and retain the best quality possible!
I love slow motion drone footage it gives such an awe inspiring and majestic feel to the footage!
Since high frame rates are so demanding for drone cameras you almost always have to sacrifice the image resolution to achieve high frame rates. For example, my DJI drone will only record high frame rates in 1080p HD recording settings.
White Balance
White balance is, quite simply, the colour temperature of your drone footage. It is basically how warm (yellow) or cold (blue) your footage looks. You are able to adjust the white balance while taking and recording footage or you can adjust it in postproduction.
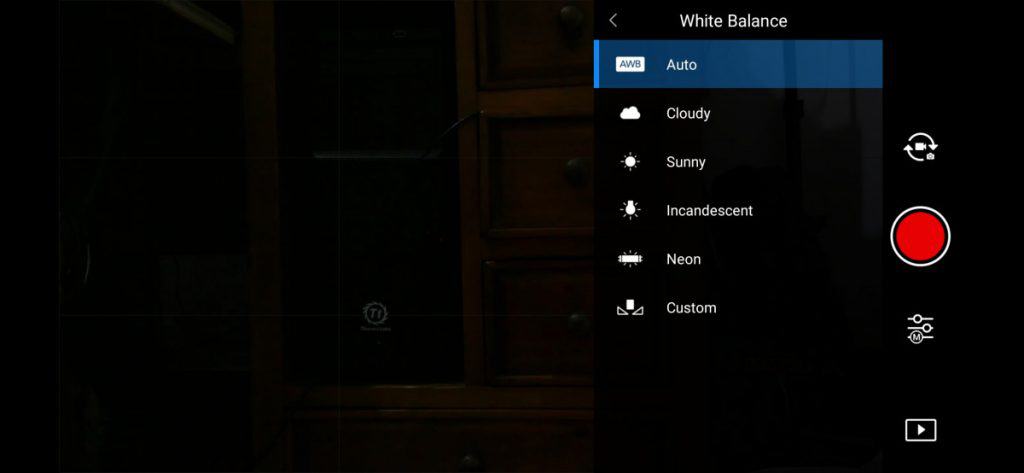
The goal of white balance is to make the photo look as neutral as possible so that all of the whites look white and are not shifted to blue or yellow.
There are a variety of options which are baked into the drone settings and you should learn which ones work best for your drone in different lighting environments. However, you should never use auto.
The most drone photographers auto will be fine but the issue is these values are not fixed and they will adjust while you are filming. If you are looking to use long sweeping and uncut shots you may have to set the white balance manually so that it retains its fixed settings throughout the entire shot.
Here are the options available on a wide variety of drones:
- Auto
- cloudy
- Sunny
- Incandescent
- Neon
- Custom
The simplest way to correct white balance of a drone is to get a white piece of paper and manually adjust the temperature of the shot until the paper looks white. Alternatively, professionals use grey cards to perfectly balance the whites in a photo.
Style
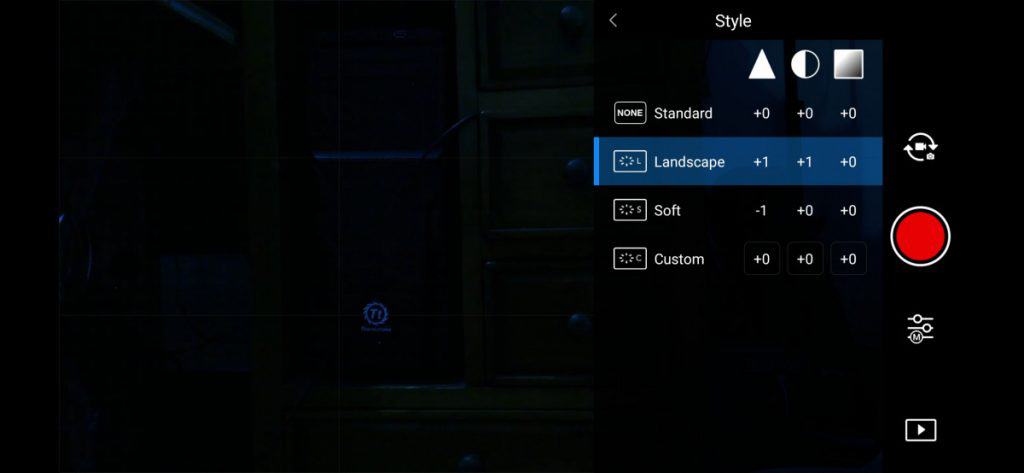
The style settings of a camera adjust the sharpness, colour tone, and saturation of the image. This is shown to you as three numbers. The numbers can be adjusted from -3 to +3. The styles available on a number of DJI drones include:
- Standard – this is the most basic tone settings and can be used to take decent shots of most scenes.
- Landscape – is designed to give enhanced sharpness and colour tone to the image. Signified as +1 in the settings.
- Soft – soft reduces the sharpness so that your drone footage looks a little bit more subtle around the edges of the subjects.
- Custom – you can adjust these three settings as you want.
Most the time I simply record my drone footage in standard style. As you become more familiar with the different types of feelings you want to get from each shot you will be able to slowly hone in on the exact settings you want for each parameter in the style menu.
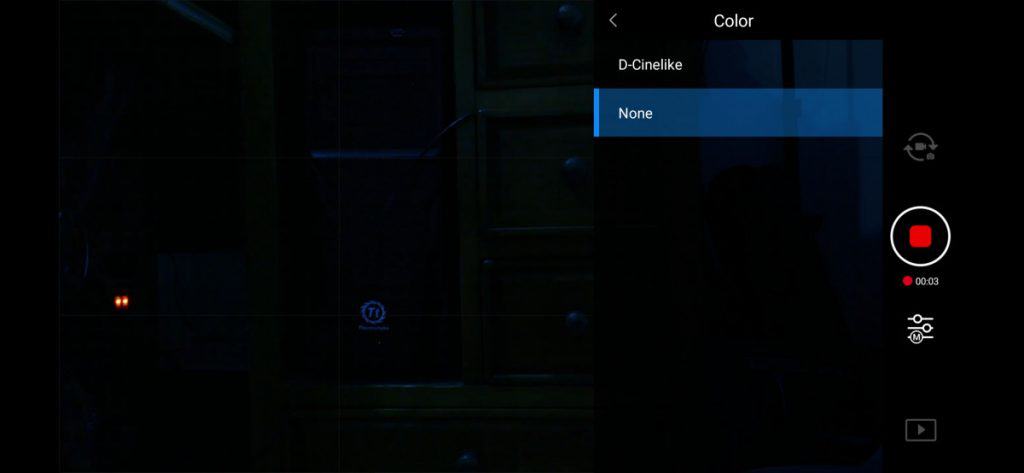
Color
The colour setting will provide you with D-Log, none or D-Cinelike.
Cinelike – Use this one
this mode is a unique video colour profile that DJI has created full-service higher end and consumer level drones. This colour profile captures a broad range of colours and is not flat like D-log.
This mode preserves the shadows, highlights, and mid tones which can be altered during colour grading to make the footage look excellent.
This mode is considered to be the most representative of what the camera sees. Drones that support this colour profile include the DJI Mavic Air: DJI Mavic air 2, the DJI Phantom series and the DJI inspire series.
You will need to do a little bit of colour grading if you’re using this camera mode.
D-Log
This is a flatter colour profile than Cinelike. This setting has been designed to maximise the dynamic range of the video footage captured by the drone stop this means that it stops the shadows from being too dark and stops the highlights from becoming too bright. For example, if you’re shooting in challenging light conditions with a strong highlight and very low shadows this mode will allow you to retain a lot more data than if you are in the default drone setting.
This comes a cost: Firstly, please note that LOG footage increases dynamic range at the cost of noise.
Normal
Footage captured in the normal colour profile will look bright, saturated and vibrant as soon as is pulled from the drones microSD card or from the internal memory. This is the best option for new and hobby drone pilots who want to capture some cool area footage without having to colour grade it.
After colour grading, footage captured from Cinelike and D-log will be much better than footage captured in the normal mode.
These three colour profiles all have their uses and for most people, the normal one will be just fine.
If you are looking to create professional, cinematic footage you should shoot in Cinelike or D-log so that you are able to colour great the footage and make the video pop for all the right reasons!
Summary
In this article, we have gone over how to change the video format on DJI drones and also the most important video settings to make sure your drone footage looks amazing all the time.
Get used to these what the settings do and you’ll be well on your way to becoming an expert in DJI drone cinematography.