![Drone gimbal overload [Causes, fixes and photos]](jpg/drone-gimbal-overload-768x480.jpg)
Gimbals are a very important part of camera drones. Gimbals are the thing that make sure your camera can capture smooth video and blur free photographs as the drone is trying to combat wind conditions as well as vibrations and bumps caused during flight due to the operator being too harsh with the controls. The gimbal consists of a number of sensors which are able to detect the movement of the drone and then send information to small brushless motors which counteract that movement keeping the camera in a smooth motion or as stationary as possible. Sometimes, you may get a message stating that your gimbal is overloaded.
Gimbal overload is typically caused by a foreign body blocking the movement of the gimbal so that the motor can no longer move. This could be the gimbal clamp, used for transporting the drone, some grass or dust that has worked its way into the gimbal mechanism or unusual drone movement.
The gimbal can exist as a two axis or three axis gimbal. If you want to know more about the difference between these two types of gimbals you should check out my other article – two axis versus three axis gimbal on a drone [diagrams and examples].
No matter what the gimbal type there can be a range of reasons why you are getting an error message telling you about gimbal overload.
What causes gimbal overload?
Normally, as a pilot, I am first notified about a gimbal issue via the app which I am using to control my drone. I have experienced a range of different errors and have also come across my fair share of gimbal overloading errors.
Even though my first reaction is to panic and think that I have irritable mercifully damaged my drone, the reality is that it is normally a very simple fix or a silly little mistake like the first reason in this list.
Something is blocking it
I often get a gimbal overload warning as soon as I start up my drone. Sometimes I can be in a bit of a rush to launch if there is something cool that I want to capture or if I am just not paying particular attention to my typical pre-flight routine.
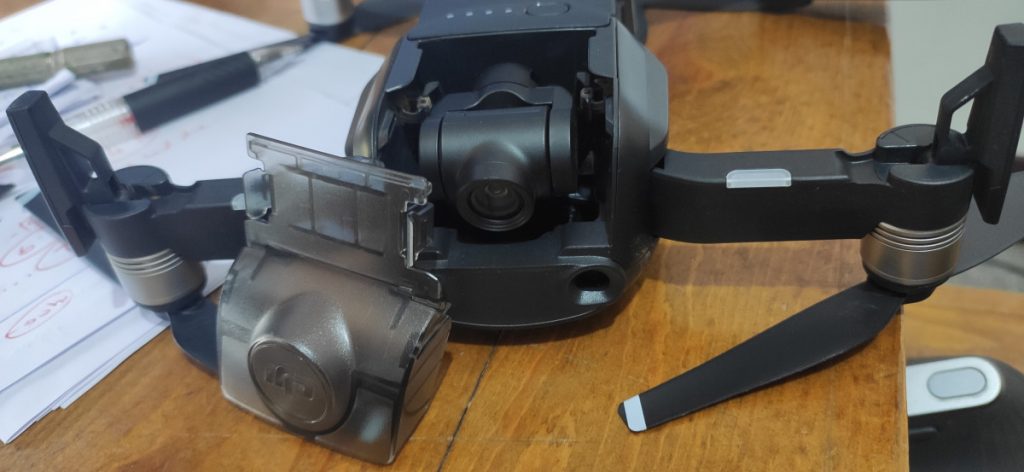
The most common reason I have received this message is when I have not taken off the drone gimbal clamp or remove the protective cover.
Each drone comes with its own series of protective clips and clamps to protect the delicate gimbal motors during transportation to the takeoff zone.
If, I have removed the gimbal clamp and the cover there is also a second very obvious issue which is very easy to rectify.

Depending on the takeoff site there may be long grass, rocks, or a very uneven surface. Before the drone takes off it does its own pre-flight checks as soon as you turn it on which involves moving the gimbal and camera through its range of motion. During this check the camera can easily get stuck on grass, rocks, or other things which are on the takeoff point.
All I have to do to rectify this issue is move the drone to a more suitable takeoff point all use a landing pad to make sure that the gimbal and camera are not affected by any thin underneath the drone.
If you want to know more about landing pads and how I have used them check out my other article – do I need a landing power for my drone? A complete guide to drone landing pads – click here to be taken to article.
Another issue which may arise is that the gimbal is overloaded because it is trying to counteract movement which is not typical of a drone in flight.
It is trying to counteract unusual movement
Gimbals are designed to counteract the movement that a drone is likely to encounter as it is flying. However, at the extremes of these conditions the gimbal can work too hard and cause gimbal overload.
I know that I have sometimes flown my drone when the wind is particularly high and I have ignored the high wind warnings in order to continue my flight. Quite often this is obvious by looking at the first person view of the flight. The drone will be bouncing around and as I changed direction the drone will struggle to counteract the wind and there will be judges and bumps and jerky movement in the footage.
If you are regularly flying in particularly windy conditions all you are receiving messages about high winds it is likely that you will also receive messages about gimbal overload.
Another issue that has been observed by owners of some DJI Mavic series drones is that if they have picked up the drone after it has landed and moved it quickly and erratically they may also get a drone overload warning.
This is because the gimbal is not able to balance out the movement of a person moving the drone. It has been designed solely for counteracting the drone’s natural movement through the air.
These are two examples that are common for receiving gimbal overload warnings.
Third party accessories
Another reason why you may be receiving gimbal overload is that you have a third party accessory either on the camera – such as a neutral density filter or lens modifier, or a third party accessory which is attached to the body of the drone is interfering with the gimbal movement.
Examples of third-party accessory includes a bait dropper or release system, decals and other stickers, or anything else stuck to the underside of the drone.
If the third-party accessory is able to connect with the drone gimbal mechanism or touch the camera in any way it could cause an obstruction which will result in a drone gimbal overload warning.
Hardware failure
The last issue that can cause a gimbal overload warning is a hardware failure.
In this instance there isn’t too much you can do other than check the wiring and ribbon cables which are connecting the gimbal to the drone (if they are visible).
A hardware failure is very hard for the average person to solve on their own and therefore you will have to send the drone to your trusted DJI repair centre or, if the drone is still under warranty, you can send it back to DJI for a replacement.
The good news is that in my experience a hardware failure is relatively uncommon and it is typically the silliest of issues which result in a gimbal overload warning.
Here are some of the approaches you can take to fix a gimbal overload problem which go beyond the silly mistakes and will provide you with actionable advice if you are receiving a gimbal overload warning regularly.
How do you fix gimbal overload?
When you are out in the field, there are a number of approaches that you can try first before having to abandon your flight.
However, there are some things that you just cannot get over such as hardware issues which will require a technician to look at your drone.
In my experience, the silliest of issues seem to be the cause of my gimbal overload warning and it is because I am rushing to get in the air or I have not taken the normal amount of care during my pre-flight checks.
The first thing I always check is the gimbal clamp and cover.
Remove the gimbal clamp
When you first turn on a drone it is likely that it will go through a range of checks.
These checks include slowly turning the motor, panning the camera up and down, and a number of internal electronic checks.
Because drones are taken to a range of locations the manufacturers often include plastic protection covers and clamps for the gimbal to protect the delicate brushless motors. It is these plastic protectors and clamps which can cause a gimbal overload warning.
What is a gimbal clamp on a drone?
A gimbal clamp is used on a drone camera which has 360° rotation around the base of the gimbal.
Without this clamp the drone camera flops around in reaction to how the drone is being carried and transported. In order to protect the motors, camera sensor, electronics, and lenses the gimbal clamp holds the gimbal securely in place.
The gimbal clamp is simply a small plastic clip and is easy to forget when you are taking off and starting up your drone.
What is a gimbal protector?
Some drones, like my DJI Mavic Air have a full clamp and cover which protects the drone camera during transport. This gimbal protector functions as both a clamp as well as a shield for transport.
This simple piece of plastic quite often blends in with the colour of the drone’s body which means that it is easy to not notice when the drone is on the ground and you are rushing to take off.
Simply removing this gimbal protector upon start up will avoid any drone gimbal overload warnings.
Calibrate the gimbal
Another important and easy fix for a gimbal overload warning is to calibrate the gimbal.
This can be done on site, in the field, before takeoff if you are getting a drone gimbal overload warning.
The exact process changes from manufacturer to manufacturer but, typically, it is as easy as entering some software settings and clicking on “calibrate gimbal”.
In the DJI GO4 app you simply have to go to the top right hand corner and click on the three dots. This will open the general settings.
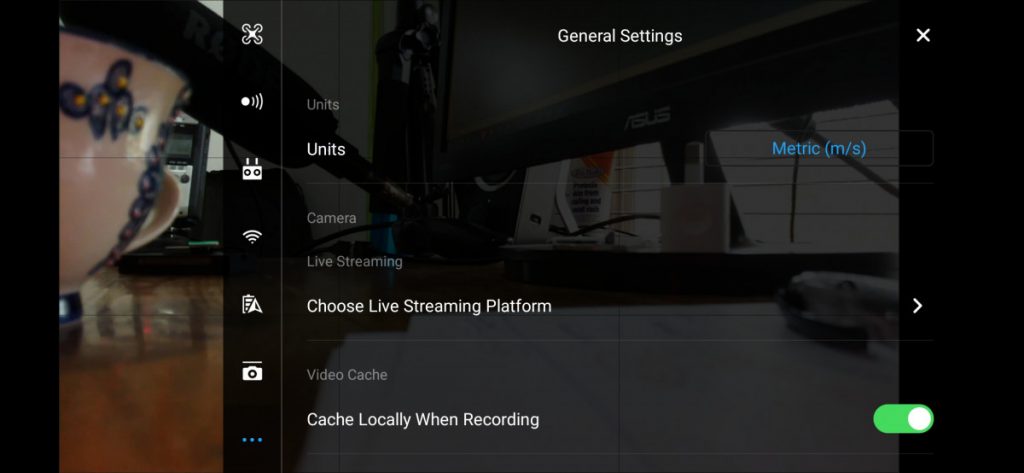
Then, you can click on the gimbal icon which will take you to the gimbal settings:
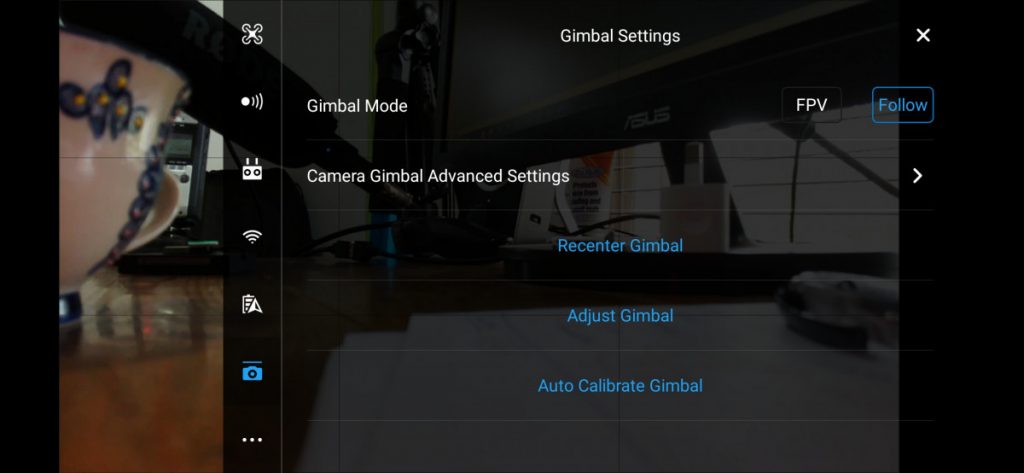
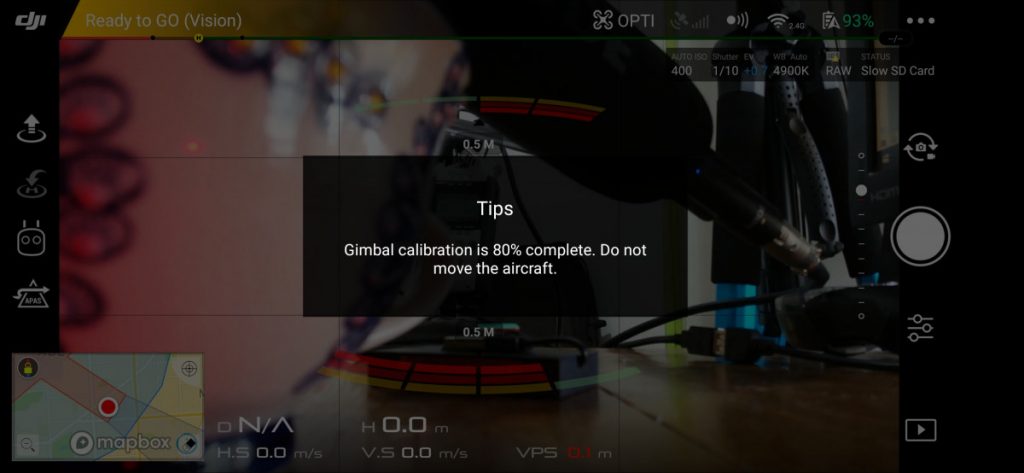
After that you can click on auto calibrate gimbal which will bring up a warning to check that the aircraft is level and that nothing is obstructing the gimbal’s range of motion. Pushing okay will start the calibration.
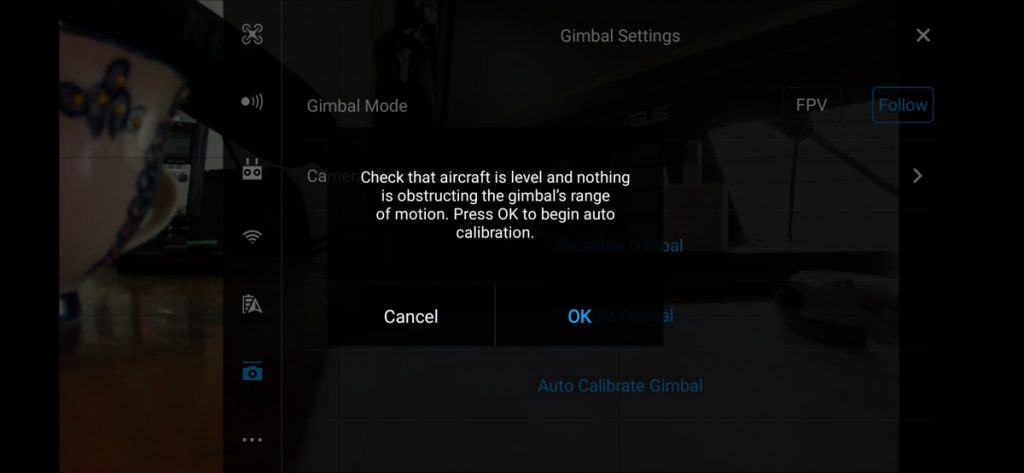
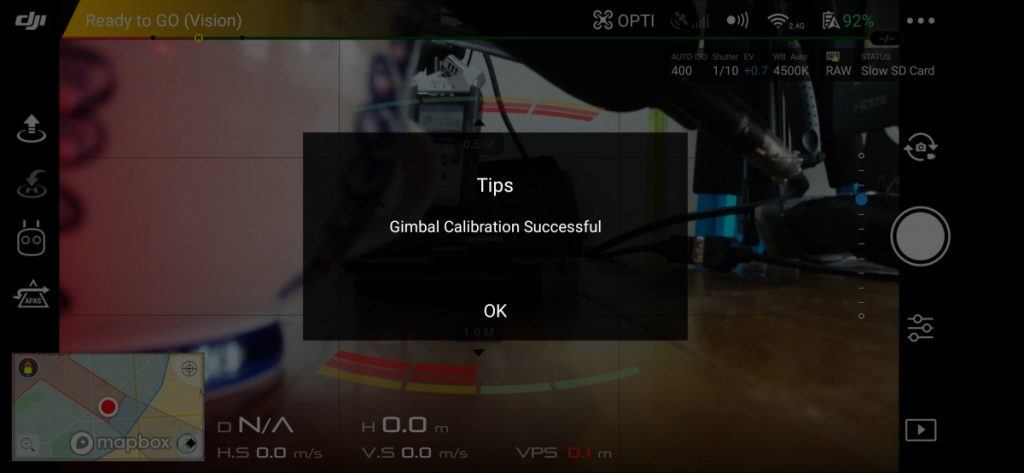
You will receive a message once the gimbal calibration has been successful and this should have removed any drone gimbal overload warnings which you have encountered.
If you do not have a successful result you should move away from the software and start looking at other things such as obstructions and issues with the gimbal motion.
Look for obstructions
Obstructions to the gimbal come in a whole range of varieties. It could be something that is actively stopping the gimbal from moving – such as an obstruction on a landing or takeoff point. And it can also be something that has worked its way into the gimbal mechanism over time.
Close inspection of the gimbal mechanism and its cleanliness will help you work out which of these it is.
Long grass
Some people have noticed that long grass, and I have found it with uneven takeoff spots with rocks, is enough to inhibit the full range of movement of the gimbal as it does its own pre-flight checks.
The easiest way to get around any obstruction before takeoff is to use a drone landing pad or there have been people that have used a cheese board or other flat surface which they have to hand in their car at the moment the gimbal warning is displayed.
If the obstruction at the takeoff point is not obvious it may be that something has worked its way into the mechanism over time.
Check for sand and dust
We all take off in non-ideal circumstances. For example, I live in Australia and I have regularly taken off on dirt parts and roads. This can cause a lot of fine dust to accumulate on the nooks and crannies of the drone which includes the gimbal and surrounding areas.
Take a good hard look in the mechanism of the gimbal. It is not always completely obvious that there is sand or dust as it can work its way in over time.
That is, when you take off in a dusty environment and return, replace the protective, and travel home the dust can easily work its way in without you noticing.
It isn’t until your gimbal starts moving again that the piece of dirt or sand can easily make its way into the mechanism more deeply.
Do not be tempted to blow this mechanism with your breath. Use a camera cleaner with a puffer to gently blow out the mechanism in order to dislodge any fine grains of sand or dust.
Remove Filters
I neutral density filters f you are still not having any luck with removing the drone gimbal overload warning you should remove any third party filters or accessories in order to judge whether or not these are the cause of your issues.
Neutral density filters are like sunglasses for your drone camera. They are a tool that should be in every serious drone photographers toolkit. It simply reduces the amount of light making its way into the camera and onto the sensor. They are called “neutral” because they do not change the colour of the image that is being captured. They allow you to do a number of different things:
- they allow you to avoid overexposure when using long exposure times
- they allow you to open up your aperture more
- and they allow you to capture really awesome coloured images on bright days
If you’re serious about drone photography and you want to capture the best images possible then buying a good set of neutral density filters for your drone is a must. You have to buy the neutral density filters that are specific to your drone’s camera. Typically, they screw or clip onto the front of the lens. They need to be securely attached to the drone so they don’t fall off while flying or cause issues with gimbal movement.
Update firmware
Some of the most common issues with drones can be solved by updating the firmware to the newest version.
Quite often, the firmware updates include fixes to common problems that have been identified on the forums as well as security patches and fixes which will make your flight more secure.
Next, you should make sure that your drone is operating on the most up-to-date firmware available from the manufacturer. The firmware not only contains things like security updates and fixes to bugs and new features – it also contains fixes to common issues reported by drone customers.
Also, make sure that the remote controller is also up-to-date in terms of the firmware and that the DJI GO4 app or whatever app you decide to use to fly your drone is also the newest for your model of smart phone.
Send to manufacturer for repair
The last option that you have if you are regularly receiving drone gimbal overload warnings is to send it back to the manufacturer for repair.
Reaching out to the manufacturer may also give you a few more options that are specific to that drone and have been identified as an issue for other drone pilots.
This is a last resort option if you have tried all of the things, above.
I have found that every issue I have had with my DJI drone has been able to be resolved either with finding information online or by speaking to customer service representative at the manufacturer.
Summary
In this article, we have gone over all of the common issues which causes gimbal drone overload warnings including blockages, sand and dust, gimbal protectors as well as calibration and firmware issues.
Your last case scenario is that you will have to send it back to the manufacturer for replacement.
Good luck solving your issues and happy drone flying!